
Universal Analytics (UA) is set to deprecate in July 2023, and UA data won’t carry over to GA4. This article provides an easy step-by-step on how to set up GA4 with basic event tracking.
Heads up: this article doesn’t include linking Google Ads to GA4, but Momentic’s sister company Granular is your best resource for all things paid search.
The advantage of setting up GA4 now is you’ll have at least a few months of data to work with once Universal Analytics is retired. Your best bet is getting familiar with GA4 before it’s your only option.
How to Set Up GA4
If you’re setting up Google Analytics on your site for the first time it will default to GA4, but you can still tack on a UA property if you want both. Unless you’re already comfortable in UA you might as well skip it.
Procedure if you already have Universal Analytics installed
<div class="post-alert">Helpful to know: <ul><li>UA is one property within your Google Analytics account.</li><li>Setting up GA4 adds a second property under the same account.</li><li>UA will stop collecting data in July 2023.</li><li>Historical UA data will be available until January 2024, then it’ll be gone.</li> <li>Starting in March 2023 Google will begin creating automatically configured GA4 properties - but doing it yourself is better.</li></ul></div>
<div class="post-action">Go to Google Analytics and find this message across the top of the page:</div>

<div class="post-action">Click Let’s Go. This will take you to the admin view of GA where you can create a new property. </div>
If you don’t see the blue banner you can get to the same admin view by clicking Admin in the bottom left corner:

<div class="post-action">Find GA4 Setup Assistant. It’s the top item in the middle column:</div>
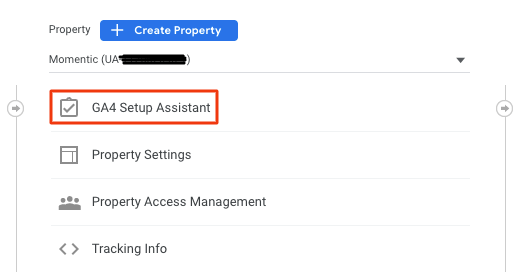
<div class="post-alert">Before you click: peep the tiny dropdown menu right above it, and make sure you’re in the principal UA property you use to collect and analyze data for your website.</div>
Click GA4 Setup Assistant.
<div class="post-note"> If the next screen has this message:</div>

<div class="post-action">Click Account Access Management under the left-hand column to see which account is the admin. You'll need to log in as the admin (or get them to share editor permissions with you) in order to proceed.</div>
<div class="post-action">Click Get Started:</div>

<div class="post-note">If your site uses a global site tag <code>gtag.js</code>, you might be able to enable GA4 data collection with your existing tags. If so, you’ll see the option: Enable data collection using your existing tags in the Setup Wizard. But for the purposes of this article, we’ll use Google Tag Manager to create tags.</div>
<div class="post-action">Click Create Property.</div>
<div class="post-note">Wait for the message “You have successfully connected your properties” at the top of the page.</div>
<div class="post-action">Click See your GA4 property. This opens Setup Assistant in the new GA4 property. Back out of there and click on Admin in the lower left corner.</div>
<div class="post-action">Click Data Streams.</div>

<div class="post-action">Click Web.</div>
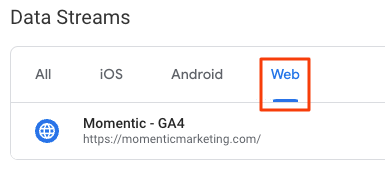
<div class="post-action">Click on the data stream for your property.</div>
<div class="post-action">Copy the Measurement ID - you’ll need this to set up GA4 event tagging in Google Tag Manager.</div>
Business Objectives: Same Reports, Different Arrangements
In April 2023 Google rolled out a new option when creating a new GA4 property. Now, after creating the property and entering your business details (industry, business size, currency) you're prompted to choose your business objectives:
"For reports that are personalized to your business, select the topics most important to you."
This might seem like a profound ask so early in the setup, but don't worry:
No matter what you choose, you'll have access to ALL THE SAME REPORTS. Choosing one option or another just arranges them differently in the report sidebar, the left-hand navigation inside GA4.
If you prefer the classic report sidebar (from before this option was introduced) select "Get baseline reports". You can always customize how reports are presented in the sidebar later on.
Another cool thing about GA4 reports is that you can customize the reports themselves. But that's a topic for another blog - let's carry on with the setup.
Data Retention Settings
This Analytics Help page has all the details on data retention settings for UA and GA4. Here’s the condensed version for our purposes today:
Universal Analytics properties:
- You can set it up so your data will never automatically expire.
- You can also set data retention to expire after 14, 26, 38 or 50 months.
GA4 properties:
- Your data will automatically expire after 14 months, maximum. The other option is 2 months.
- No matter what your data retention settings are, certain user-provided data including age, gender and interests will always expire after 2 months.
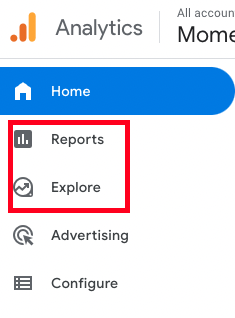
- GA4 data retention settings only apply to Explorations—not the standard GA4 reports.
<div class="post-note">Standard GA4 reports are found under Reports in the left-side navigation. Explorations are found under Explore.</div>
How to Increase the Data Retention Period in GA4
<div class="post-action">Click on Admin at the bottom of the left-hand navigation.</div>
<div class="post-action">In the Property column, click Data Settings, then click Data Retention.</div>

<div class="post-action">Use the dropdown to select 14 months:</div>
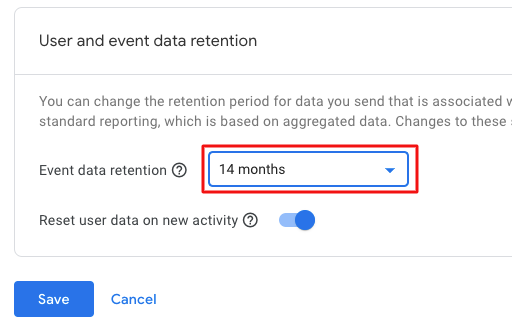
<div class="post-note">There’s a toggle right below that to ‘Reset user data on new activity’ - you should toggle it on. This resets the data retention period with each new GA4 session, based on user identifier. So if somebody visits your website repeatedly, their user identifier gets refreshed with each visit, which extends the data expiration date. If a user goes 14 months without visiting your site again, their data is automatically deleted.</div>
<div class="post-action">Click Save to save your data retention settings.</div>
How to Set Up GA4 Events [Tag Manager]
There is a migration tool in UA that can import your UA goals as conversions in GA4. You can learn more about it on this Analytics help page. For the purposes of this article we're focusing on sites that use Google Tag Manager, in which case the best practice is to create GA4 conversion events in GTM.
Shout out to Julius Fedorovicius’s Analytics Mania for being a great resource for all things Tag Manager and Analytics. I’m sharing simplified instructions here, based on my own trial and error (and eventual success) after learning from his free blogs.
1: Create a GA4 Configuration Tag
Go to your property in Tag Manager. If you don’t have Tag Manager set up, follow these instructions.
<div class="post-action">Click Tags > New.</div>
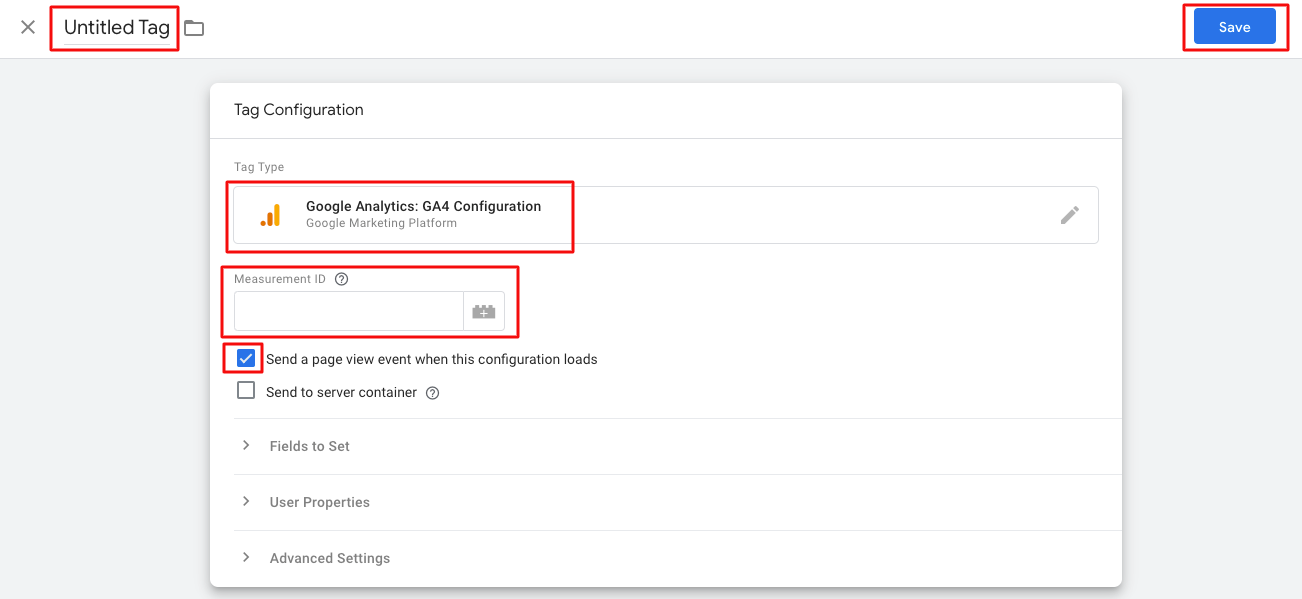
<div class="post-action">Click Tag Configuration.</div>
<div class="post-action">Choose Google Analytics: GA4 Configuration.</div>
<div class="post-action">Enter the Measurement ID you just grabbed from the GA4 data stream.</div>
<div class="post-alert">Keep this option checked: Send a page view event when this configuration loads.</div>
<div class="post-action">Give your tag a name.</div>
<div class="post-action">Click Save. </div>
<div class="post-action">Click Triggering.</div>
<div class="post-action">Choose the Initialization - All Pages trigger. Don’t get it confused with the “All Pages” trigger:</div>

<div class="post-note">NOTE: The “Initialization - All Pages” trigger ensures data is properly sent to GA4 before any other tags on the page fire. This is particularly important for sites using a single-page application (SPA).</div>
<div class="post-action">Click Save.</div>
<div class="post-action">Click Submit, then click Publish.</div>
2: Filter Out Your IP Address
This isn’t practical if your company’s staff work out of multiple locations. But if you have a central office everyone works from, you should create an internal traffic rule to filter out the IP address so internal traffic data doesn’t get collected.
In GA4:
<div class="post-action">Click Admin > Data Streams.</div>
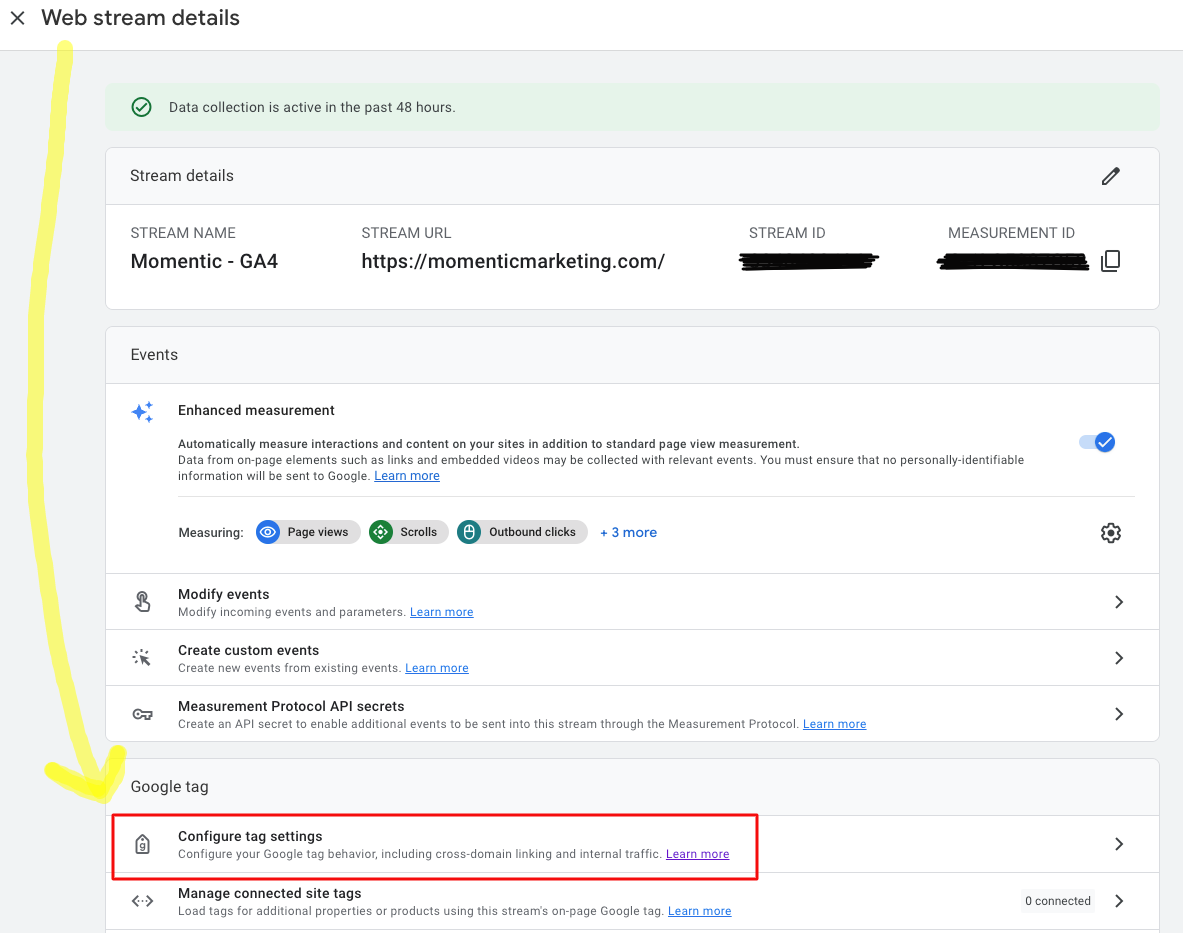
<div class="post-action">Click Web, then click on your website data stream.</div>
<div class="post-action">Click Configure tag settings:</div>
<div class="post-action">Click Show all inside the Settings tile:</div>
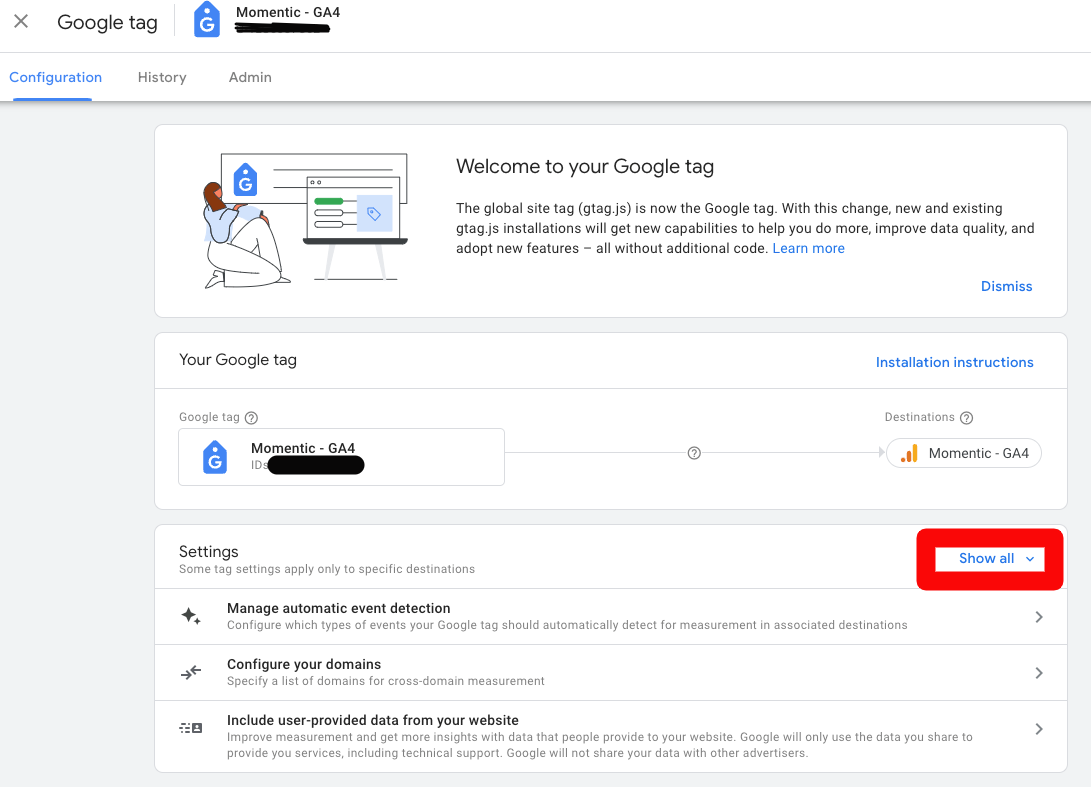
<div class="post-action">Click Define internal traffic.</div>
<div class="post-action">Click Create.</div>
<div class="post-action">Enter a Rule name (Example: “Office IP address”).</div>
<div class="post-alert">The <code>traffic_type</code> value field should already say internal.</div>
<div class="post-action">In the “Match type” field select IP address equals.</div>
In the “Value” field put your IP address.
If you don’t know your IP address, click the “What’s my IP address” prompt (or just Google it).
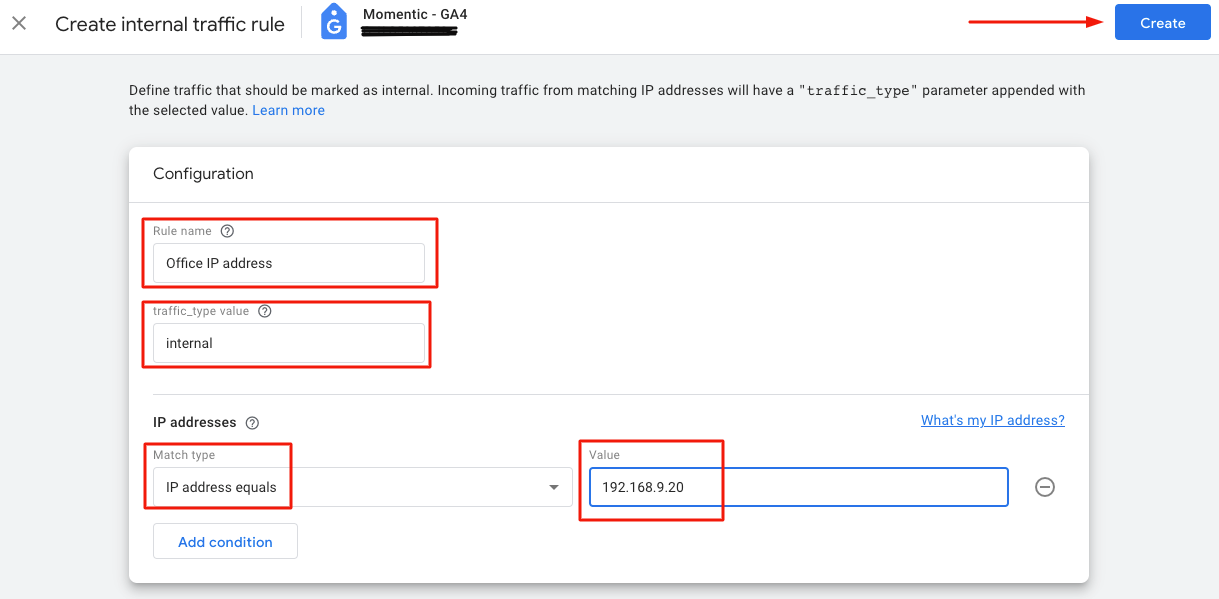
<div class="post-action">Click Create to save the rule.</div>
3: Set Up Form Submission Tracking
We’ll cover three different methods of tracking form submissions:
- GTM's built-in Form submission trigger - this is the easiest method and worth trying to see if it will work for your site's forms.
- Thank-you pageviews - use this if users are sent to a thank-you page with a unique URL after submitting a form.
- Visible elements - use this if users get a pop-up success message on the same URL after submitting a form.
But before we get to those, here’s a special note for websites that use an embedded app for their contact form:
Tracking Submissions from Contact Form Apps
If your website uses a third-party contact form app, you’ll probably need to integrate it with GA4 from the app dashboard. So make sure you know what kind of contact form you’re working with before attempting to set up form submission tracking.
Let’s look at a couple examples.
Outgrow provides a video tutorial on how to set up Google Analytics events in their dashboard, and offers additional support via email.
Paperform provides step-by-step instructions on how to link your GA4 property inside their form editor and also offers email support to customers.
When using an embedded contact form from a third-party app, start by exploring the resources offered by the app creator, because that’s most likely how those contact form submissions will get tracked in GA4.
Form submission trigger method
GTM has a built-in trigger that detects website form submissions. It may not work with all types of web forms, but it's worth a shot.
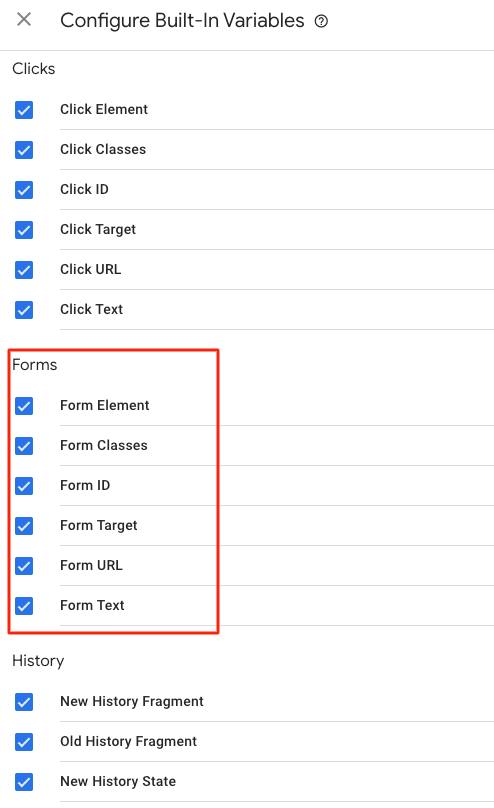
First you need to enable the built-in form variables in GTM. This step is literally just checking some boxes.
<div class="post-action">Click Variables > Configure</div>
Scroll down to Forms and click all the items to enable them:
Your changes automatically save.
<div class="post-action">Click Triggers > New > Trigger Configuration</div>
<div class="post-action">Select Form Submission</div>
<div class="post-action">Click Check Validation</div>
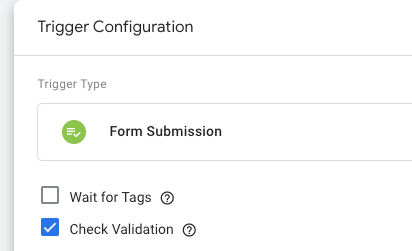
This step makes sure the trigger only fires when a form is successfully submitted. Otherwise it might fire when a user attempts to submit a form (for example if required fields are left blank and the form doesn't actually get submitted).
Avoid this known issue with the Form Submission trigger
If your website has a Facebook pixel injector tag it can cause GTM's Form submission trigger to fire when the page loads. To keep this from happening, take this extra step when setting up the Form submission trigger:
<div class="post-action">Click Some Forms</div>
<div class="post-action">In the first two dropdown fields, select Click URL and does not contain.</div>
<div class="post-action">In the third field, enter https://www.facebook.com/tr/</div>
This will prevent false Form submission events caused by the Facebook pixel. If your website doesn't have Facebook tracking, you can skip this step.
Name and save your trigger. Next, we'll create a tag to pair with it.
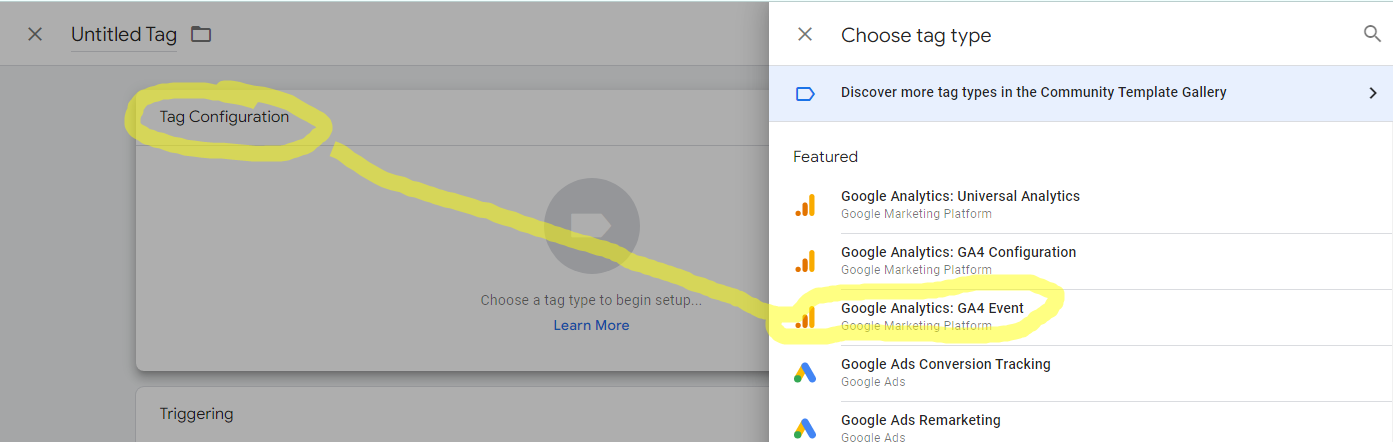
<div class="post-action">Click Tags > New > Tag Configuration</div>
<div class="post-action">Click Google Analytics: GA4 Event.</div>
<div class="post-action">Select GA4 Event Tag from the dropdown menu.
<div class="post-action">Enter the event name (this is what the event will be called in GA4).
<div class="post-note">You can name GA4 events anything you like. Choose a standard naming convention from the start and stick with it. I chose the same format as Google’s recommended events (all lowercase, with underscores between words). Examples of form submission event names:<ul><li><code>contact_form_submission</code></li><li><code>quote_form_submission</code></li><li><code>career_form_submission</code></li><li><code>file_upload</code></li></ul></div>
<div class="post-action">Click Event Parameters. </div>
<div class="post-action">Click Add Row. </div>
<div class="post-action">Enter Parameter Name: <code>page_url</code></div>
<div class="post-action">Select Value from menu: Page URL</div>
<div class="post-note">NOTE: You’re entering this event parameter so later when you look at reports in GA4 you can see which page a user was on when they completed the event.</div>
<div class="post-note">Ignore User Properties and Advanced Settings</div>
<div class="post-action">Click Triggering and choose the Form Submission trigger.</div>
<div class="post-action">Click Save. </div>
<div class="post-action">Click Preview and test the event.</div>
<div class="post-action">After a successful test: Click Submit, Publish.</div>
If the test was not successful in Preview mode, you'll have to use a different method of tracking form submissions.
Thank-you page method
There are two ways to create an event for thank-you page visit events in GA4. You can set it up through GTM or directly in GA4.
How to create a thank-you page event using GTM:
<div class="post-action">Click Triggers > New</div>
<div class="post-action">Click Trigger Configuration.</div>
<div class="post-action">Click Page View</div>
<div class="post-action">Click Some Page Views</div>
<div class="post-action">Select/enter the following:</div>

<div class="post-alert">(Make sure to use your site’s thank-you page URL, not this example.)</div>
<div class="post-action">Click Save.</div>
<div class="post-action">Click Tags > New</div>
<div class="post-action">Click Tag Configuration.</div>
Follow the same steps outlined in the previous section to complete the tag setup.
<div class="post-action">Click Triggering and choose the correct Trigger for this new event tag.</div>
<div class="post-action">Click Save. </div>
<div class="post-action">Click Preview and test the event.</div>
<div class="post-action">After a successful test: Click Submit, Publish.</div>
<div class="post-note">You will need to set up a unique trigger and tag for each form’s thank-you page, so repeat the above steps as needed.</div>
How to create a thank-you page visit event using GA4:
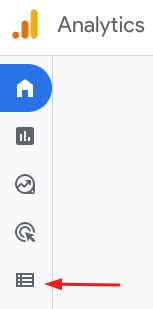
<div class="post-action">In GA4’s left sidebar menu, click Configure:</div>
<div class="post-action">Click Create Event.</div>
<div class="post-action">Click Create.</div>
<div class="post-action">Enter your Custom event name in the top field. This is only used for your reference when navigating within GA4.</div>
<div class="post-action">Under “Matching conditions,” in the “Value” field, enter: <code>page_view</code></div>
<div class="post-action">Click Add condition.</div>
<div class="post-action">In the new row, in the “Parameter” field, enter: <code>page_location</code></div>
<div class="post-action">In the “Operator” field, select: contains</div>
<div class="post-action">In the “Value” field, enter the slug for your thank-you page:</div>
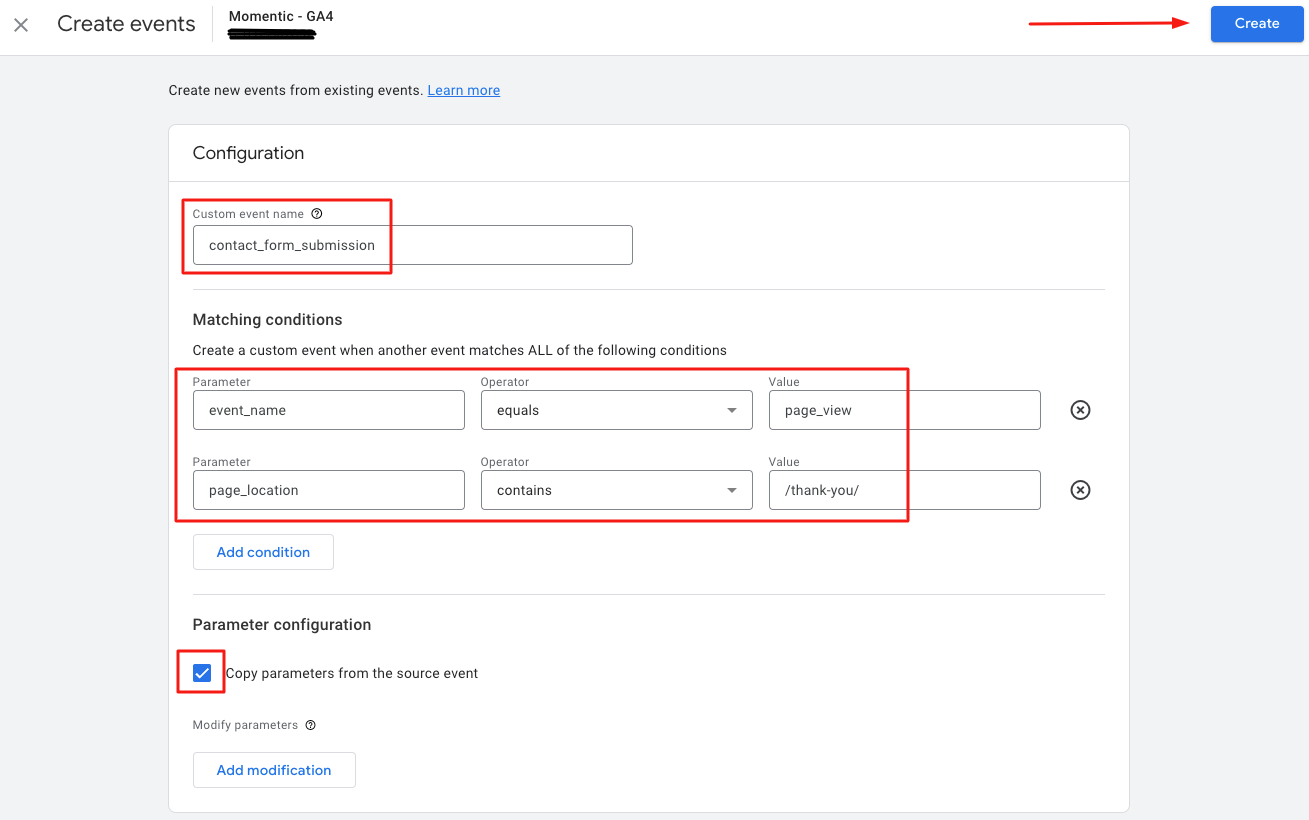
<div class="post-alert">NOTE: Make sure to use the thank-you page URL your site has, not the example in this screenshot.</div>
<div class="post-note">Leave the box ticked that says “Copy parameters from source event”.</div>
<div class="post-action">Click Create to save the event. </div>
<div class="post-note">I also recommend the following steps so you don’t have to wait for it to show up in GA4:</div>
<div class="post-action">Click Configure > Conversions:</div>
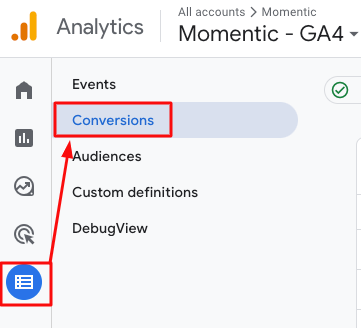
<div class="post-action">Click New conversion event.</div>
<div class="post-action">Enter the exact same event name—in this example: <code>contact_form_submission</code></div>
<div class="post-action">Click Save.</div>
Visible element method
If the built-in Form Submission trigger didn't work, and your website doesn't use thank-you pages, you can try triggering a form submission event based on the 'success message' element that appears after a form is submitted.
<div class="post-action">In GTM, click Triggers > New.</div>
<div class="post-action">Name your trigger.</div>
<div class="post-action">Click Trigger Configuration.</div>
<div class="post-action">Choose Element Visibility.</div>
<div class="post-action">Under Selection Method, choose CSS Selector.</div>
<div class="post-action">In the “Element Selector” field you need to enter a CSS selector from the specific element that shows up when a form is submitted.</div>
<div class="post-note-cute">To find your CSS selector, bring up the success message pop-up element and right-click, then choose Inspect. Learn more about element visibility triggers here.</div>
<div class="post-action">When to fire this trigger: Once per page.</div>
<div class="post-action">Leave Minimum Percent Visible at 50.</div>
<div class="post-action">This trigger fires on: All Visibility Events.</div>
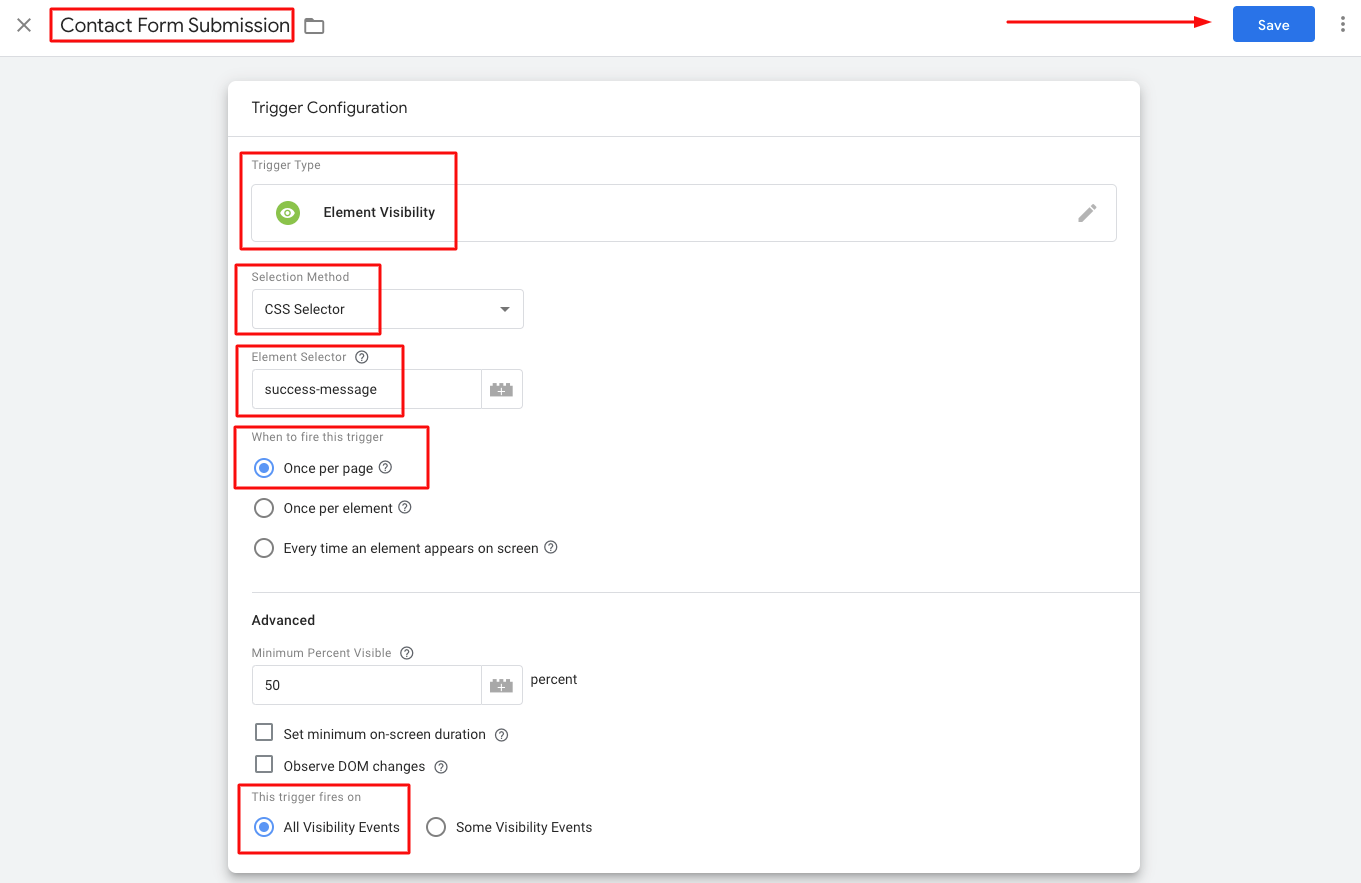
<div class="post-note">Default setting is a minimum of 50% visibility of the element to avoid tracking accidental clicks—like if someone is scrolling on a smartphone and touches the link by mistake.</div>
<div class="post-action">Click Save.</div>
<div class="post-action">Click Submit.</div>
<div class="post-action">Click Tags > New.</div>
<div class="post-action">Click Tag Configuration.</div>
<div class="post-action">Choose Google Analytics: GA4 Event.</div>
<div class="post-action">In the Configuration Tag dropdown, select GA4 Configuration.</div>
<div class="post-action">Enter your event name. This is what will show up in GA4 reports, so use the standard naming convention you decided on.</div>
<div class="post-action">Click on Event Parameters. Click Add Row. Enter Parameter Name: <code>page_url </code></div>
<div class="post-action">Select Value from menu: Page URL</div>
<div class="post-action">Click Triggering and choose the correct trigger for this event.</div>
<div class="post-action">Click Save.</div>
<div class="post-action">Click Preview and test the new trigger/tag.</div>
<div class="post-action">If they work, click Submit, then click Publish.</div>
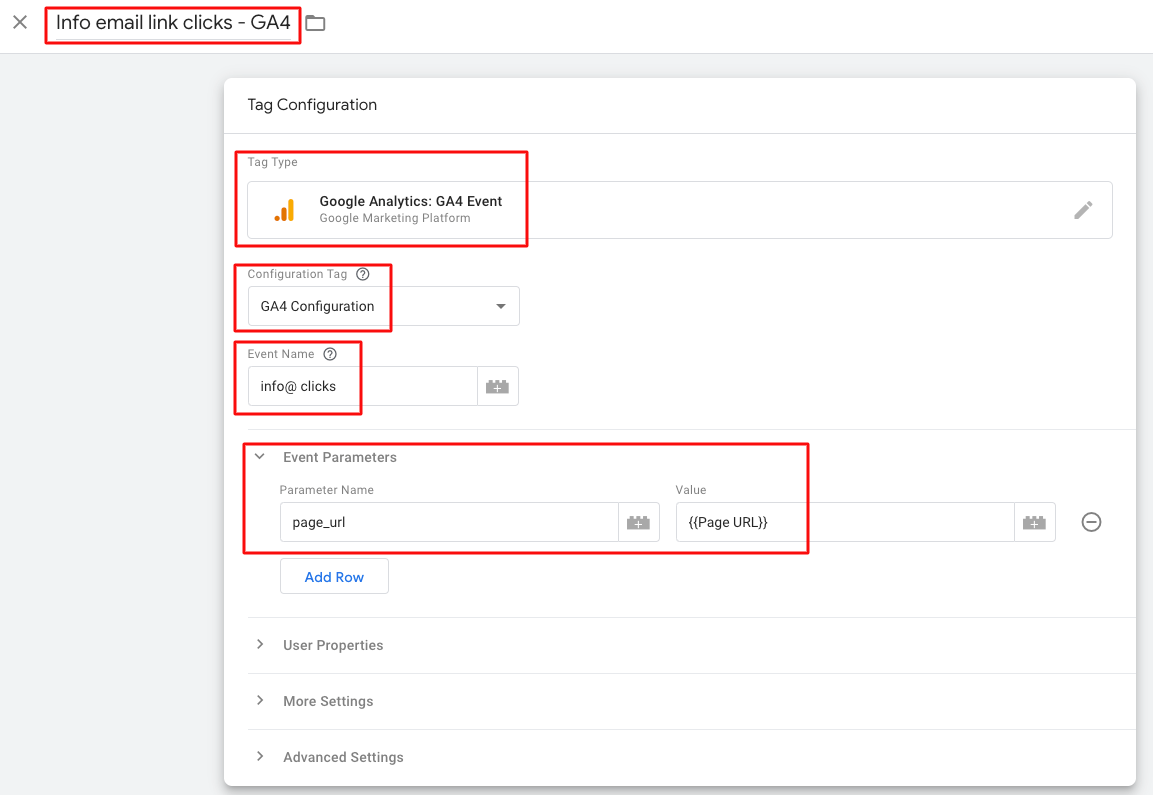
4: Set Up Phone Number & Email Click Tracking
This is how to create GA4 event tracking for clicks on linked phone numbers and email addresses.
In GTM:
<div class="post-action">Click Triggers > New.</div>
<div class="post-action">Click Trigger Configuration.</div>
<div class="post-action">Choose Just Links.</div>
<div class="post-action">Check the boxes for “Wait for Tags” and “Check Validation”</div>
<div class="post-action">Select Some Link Clicks.</div>
<div class="post-action">In the new row that appears, choose Page URL and matches RegEx.</div>
<div class="post-action">In the last field, enter <code>.*</code></div>
<div class="post-note-cute">The reason for RegEx .* is it’s telling GTM to fire the trigger if the page URL exists—in other words, for any URL on the site. This is a necessary step because spam bots can scan and click links without visiting a URL the way a human user does, which could trigger false clicks. By only letting the trigger fire when there is a Page URL, it means a user was on the page when clicking.</div>
<div class="post-action">Click the plus sign to add a new row.</div>
<div class="post-action">In the new row that appears, choose Link URL, contains</div>
<div class="post-action">In the last field, enter a uniquely identifiable part of the email or phone number link that you want to track clicks on:</div>
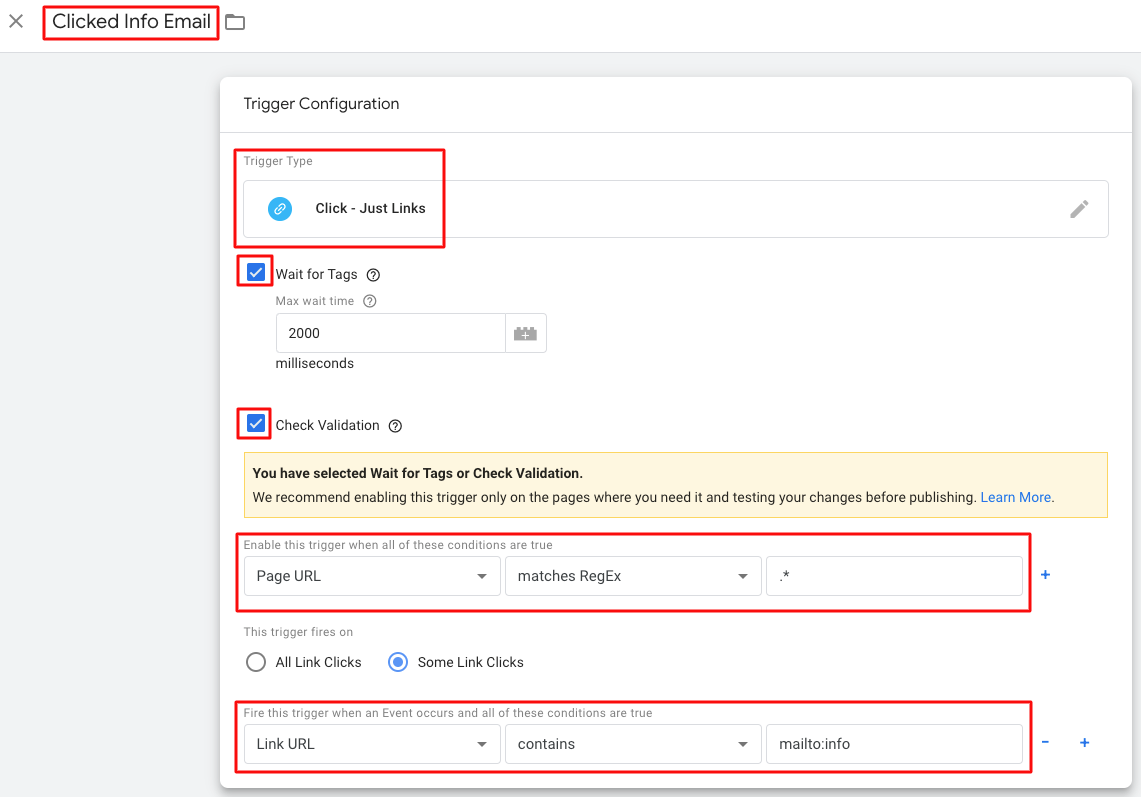
<div class="post-note">You can name this trigger whatever you like - it won’t affect the name of the GA4 event.</div>
<div class="post-action">Click Save.</div>
<div class="post-action">Click Tags > New.</div>
<div class="post-action">Click Tag Configuration.</div>
<div class="post-action">Choose Google Analytics: GA4 Event.</div>
<div class="post-action">Select Google Analytics GA4 Configuration Tag from the dropdown.</div>
<div class="post-action">Enter Event Name</div>
<div class="post-note">The name you enter in the Event Name field is how the event will appear in GA4, so use whichever standard naming convention you decided on. The name of the event in the upper left is only used within GTM.</div>
<div class="post-action">Click on Event Parameters. </div>
<div class="post-action">Click Add Row. </div>
<div class="post-action">Enter Parameter Name: <code>page_url </code></div>
<div class="post-action">Select Value from menu: Page URL</div>
Ignore User Properties and Advanced Settings.
<div class="post-action">Click Triggering and choose the right trigger for this event.</div>
<div class="post-action">Click Save.</div>
<div class="post-action">Click Preview and test the event. </div>
<div class="post-action">If it works, click Submit, then click Publish.</div>
<div class="post-note">Repeat as needed for additional phone number/email link clicks you want to track. You can also use a Just Links trigger+tag to track clicks on links going to your socials, clicks on specific nav links, or CTA buttons—any link you want to track engagement on.</div>
5. Track Clicks on a Specific Button
Sometimes you want to track clicks on a button, but it's not the only element on that page linking to a specific URL. Maybe there's also a link in the text somewhere, or a side panel, or an image. Or maybe you have two CTA buttons, one at the top of the page and one at the bottom of the page, with different text on each button, and you want to track clicks on each one separately.
If you only want to track clicks on a specific button, you can’t use Just Links as the trigger because it’ll track clicks on all the links pointing to that URL.
To narrow down to clicks on a specific button, we’ll use the button <code>Click Classes</code> variable and set up a custom parameter for the button text.
Start by setting up a new tag in GTM:
<div class="post-action">Choose the GA4 Event tag. Select GA4 Configuration in the Configuration Tag dropdown. Enter the event name as you want it to appear in GA4.</div>
<div class="post-action">Under Event Parameters, click Add row. Create a parameter name that makes sense, like button_text. That way if your site uses the same CTA button with different text, you can see how many clicks each version is getting.</div>
<div class="post-action">Click the plus sign by Value and choose Click Text from the variable menu. Review your setup and click Save in the upper right.</div>

Next, we’ll make a trigger to use with that tag.
<div class="post-action">Click Triggers > New > Trigger Configuration and choose All Elements from the trigger type menu.</div>
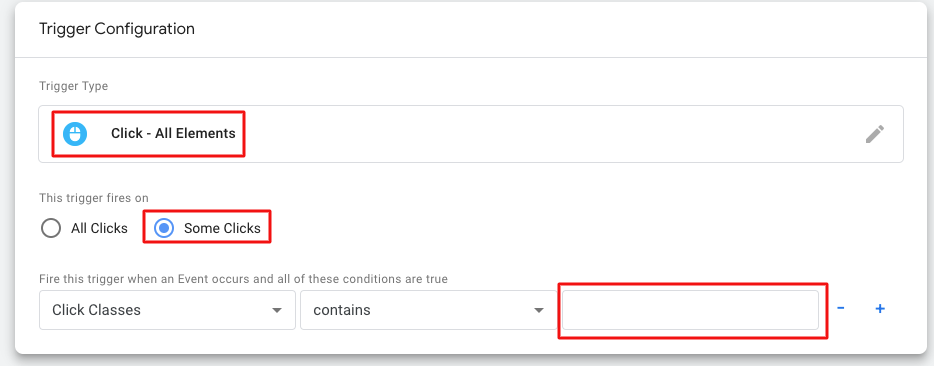
<div class="post-action">Click Some Clicks. Leave the first two fields alone, and in the third field put the <code>Click Classes</code> variable.</div>
<div class="post-note">There are two ways to find the Click Classes variable for the button you want to track:
- Go to the web page with the button. Right click on it. Choose Inspect. In the HTML for the button, look for class=”button-description-text-here”. Here’s an example using the 'Book SEO Consultation' button up in the header of Momentic's website:
<code>id="w-node-_42174848-0485-af63-0cae-9e7e7731c7ed-32f2a0d0" href="/contact" class="top-nav-button w-button">Book SEO Consultation</a></code>
In this example, <code>top-nav-button w-button</code> is the variable to use.
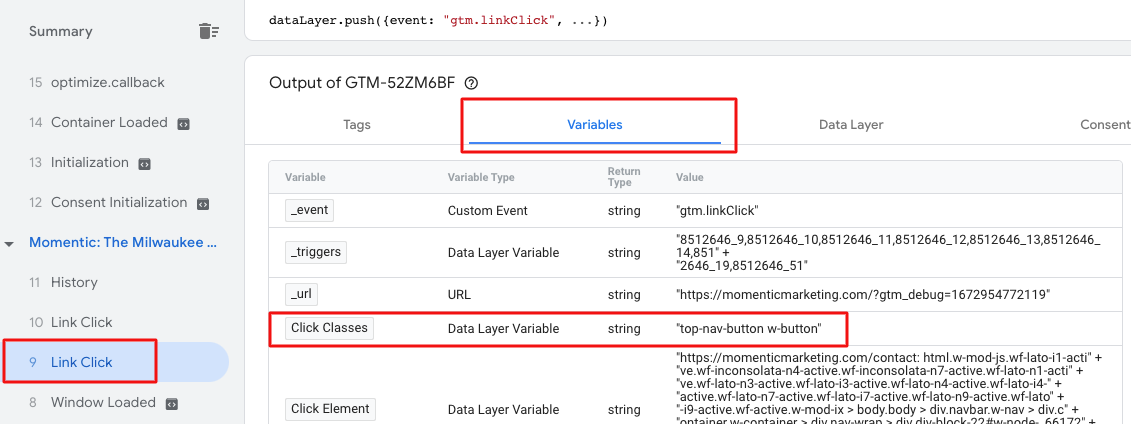
- Go into Preview mode in GTM and enter your website URL. While in preview mode, navigate to a page with the button on it you want to track. Click it. Then go to your Tag Assistant summary and click where it says Link Click. In the field on the right, choose Variables. Look for the <code>Click Classes</code> variable and get the value.
</div>
<div class="post-action">Give your new trigger a name, save it, and associate it with the new tag you made.</div>
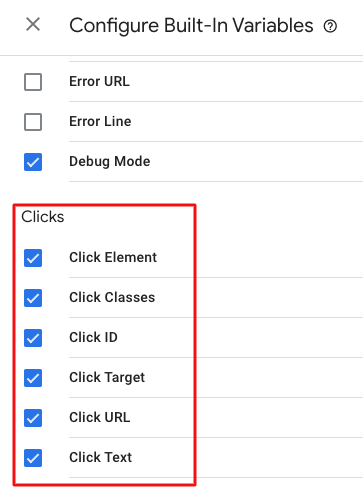
Now we need to make sure all the Clicks variables are enabled in GTM.
<div class="post-action">In GTM, click Variables in the left-side navigation, then click Configure in the upper right. Scroll down and make sure all the boxes under Clicks are checked.</div>
Then start a new Preview session to test it and make sure the event is firing correctly.
<div class="post-alert">Always test every new GTM trigger/tag using Preview, even if it’s an event you’ve successfully set up before.</div>
Keep reading to learn where to find conversion event data in GA4, along with traffic sources and other useful information.

